
This post is a real-world guide for setting up federated identity using OpenID Connect (OIDC) in any combination of
- a managed Kubernetes cluster (AWS, Google Cloud Platform),
- and an Identity Provider (Okta, Microsoft Entra ID, Google Workspace, JumpCloud)
| Integration | Google Kubernetes Engine (GKE) | AWS Elastic Kubernetes Service (EKS) |
|---|---|---|
| Okta | ✅ | ✅ |
| Microsoft Entra ID * | ✅ | ✅ |
| Google Workspace | ✅ | ✅ |
| JumpCloud | ✅ | ✅ |
* previously “Azure Active Directory”
Azure Kubernetes Service currently doesn’t support adding an external OpenID Connect Provider, and is not included. To scale to multiple clusters easily, Terraform code examples are provided in this repo: p0-security/kubernetes-oidc.
Why OIDC into Kubernetes?
“Scale” for an authentication scheme has two dimensions: scale in the number of users that need to authenticate, and scale in the number of resources/systems that they need to access.
Good “scalability” is when the authentication scheme can handle an increase along these dimensions with ease.
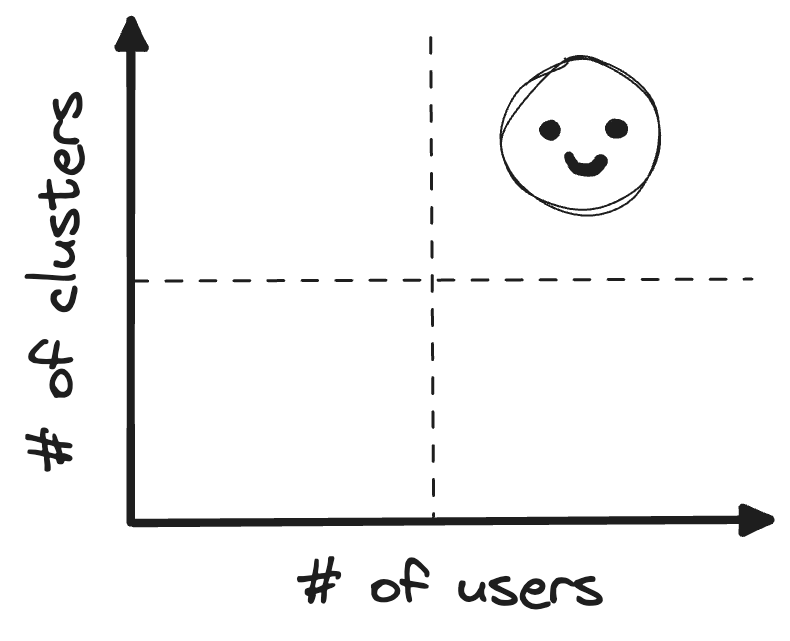
Conversely, in a non-scalable system, every user must be provisioned individually in every cluster. A non-scalable Kubernetes example is generating X509 certificates for every user in every cluster.
To scale well as the number of users grows, it’s a good idea to centralize the provisioning of these users so it only has to be done once, and doesn’t have to be repeated for Kubernetes specifically. This can be achieved in multiple ways. If you are running a managed Kubernetes cluster hosted on AWS, Azure, or GCP, then authentication to the cloud account carries over to the clusters by default. Using OIDC instead of the built-in method really comes into play if you have federated the cloud provider login to an external identity provider. In that case, there is an additional maintenance burden of mapping groups in the IdP to an identity inside the cloud account, and then in turn mapping those identities to native Kubernetes permissions. The way the mapping must be configured differs between cloud providers, adding complexity to the job in a multi-cloud environment.
To scale well as the number of clusters grows, configuring these clusters for authenticating users should be a low effort. With OIDC, a new cluster requires a one-time configuration, which is more effort than relying on the cloud provider default authentication, but it can be automated. More clusters also mean engineers must configure their kubectl client to each of these, which is easy using default authentication.
This blog post contains commands you can distribute to your users to automate this portion as well.
In the end, with OIDC, Kubernetes clusters become just another app in your identity provider. The indirection of the cloud provider in the provider → cloud provider → cluster relation is removed. Fine-grained native Kubernetes authorization can be used directly with groups and users defined in the identity provider.
Kubernetes Authentication Recap
Unlike other systems, human subjects in Kubernetes aren’t defined upfront in any way. There is no user object in Kubernetes to represent user accounts, and no group object to represent a user group. Instead, they are simple strings used in a RoleBinding object to indicate what Role the user/group has access to. A simplified RoleBinding example:
kind: RoleBinding
subjects:
- kind: User
name: jane
- kind: Group
name: engineers
roleRef:
name: pod-reader
Kubernetes identifies the user by relying on an external mechanism to prove the acting user’s name (the string value). Group membership is also provided by an external source.
Kubernetes offers three “native external” ways of authentication: client certificates, bearer tokens, and static token. To bring your own identity, Kubernetes offers the following mechanisms: webhook, authenticating proxy, and OpenID Connect. (See here).
On the client side, users must configure kubectl to pass the right values to the Kubernetes API server. Cloud providers ship their own kubectl plugins, that allow users to authenticate as an IAM user already present in the cloud provider.
- Google Cloud’s Kubernetes Engine uses Google Workspace identities and provides the gke-gcloud-auth-plugin since v1.26.
- AWS EKS uses the aws-iam-authenticator by default (see here). This drops an
aws-authConfigMap object in you cluster to map a user ARN to a Kubernetes user string.
- Azure provides the “Azure RBAC for Kubernetes Authorization” (see here).
With OIDC, it is not IAM users that log in but users from your Identity Provider. You can use the user and the group claim from the OIDC token to configure RoleBindings in Kubernetes.
Configuring OIDC takes three steps:
- Configure your Identity Provider (IdP). Your IdP must support OpenID Connect Discovery.
- Enable and configure the OIDC plugin in Kubernetes
- Instructions for your engineers to set up the
kubectlclient
Step 1: Configure IdP
OIDC is a variant of the OAuth 2.0 protocol. OIDC allows Kubernetes to federate the identification of the user to the identity providers. In a federated sign-in flow, Kubernetes receives claims from the Identity Provider about the user’s user ID, email, and group membership, and Kuberentes is able to independently verify these claims.
The Identity Provider must implement a set of standard endpoints to serve OIDC. There are multiple OAuth flows, with differing security properties. The OAuth service of the identity providers can be configured to support a subset of these OAuth flows, depending on the type of client they are serving. In our case, the client is the native application kubectl that runs a developers’ computers. We have to declare our client in the IdP, and configure the OAuth flow that suits the needs of this type of client.
OIDC Flow Considerations
In this post, we take an opinionated approach, and configure all of the covered IdPs with the same OAuth settings:
| Authorization Method | Supported |
|---|---|
| Authorization Code | ✅ |
| PKCE (Proof of Key for Code Exchange) | ✅ |
| Client Credentials | ❌ |
| Device Token | ❌ |
| Refresh Token | ❌ |
You can read more about these grant types on oauth.net.
Let’s examine our choices!
Why are we not using refresh tokens?
Refresh tokens are used to extend access to the service (in this case, Kubernetes). By using refresh tokens, we can use short-lived access tokens as the bearer token in each individual Kubernetes API request. Then, when the access token expires, we can use the refresh token one time to request for a new access token – refresh token pair from the IdP. This is handy because users do not have re-authenticate every time the access token expires, which typically has a validity of one hour. However, if we are comfortable with signing in users after the expiry of the access token, refresh tokens are not necessary. Since the sign-in flow includes logging in to the IdP via the browser, the ease of a repeated sign-in depends on the IdP’s policies, and doesn’t necessarily involve providing password and MFA again. In case of Okta, the policy is highly customizable.
Why we are not using client credentials?
Our application is a native application (the kubectl client) and we assume that it cannot keep secrets. The kubectl client is a CLI tool running on engineers’ machines. The secret would be shared across the entire engineering team. In addition, the secret would be stored in plain text in the kube config of all their computers. The client secret is better suited for scenarios where a server-side application, as a single machine identity, authenticates to the IdP. The only caveat to our plan is that Google Workspace cannot be configured without a client secret. In this case, even though we distribute a secret to developers, it does not qualify as a secret. It is however very important to verify that no other flow is allowed that uses the secret, in particular, we should make sure that the implicit flow is disabled.
Why are we using PKCE?
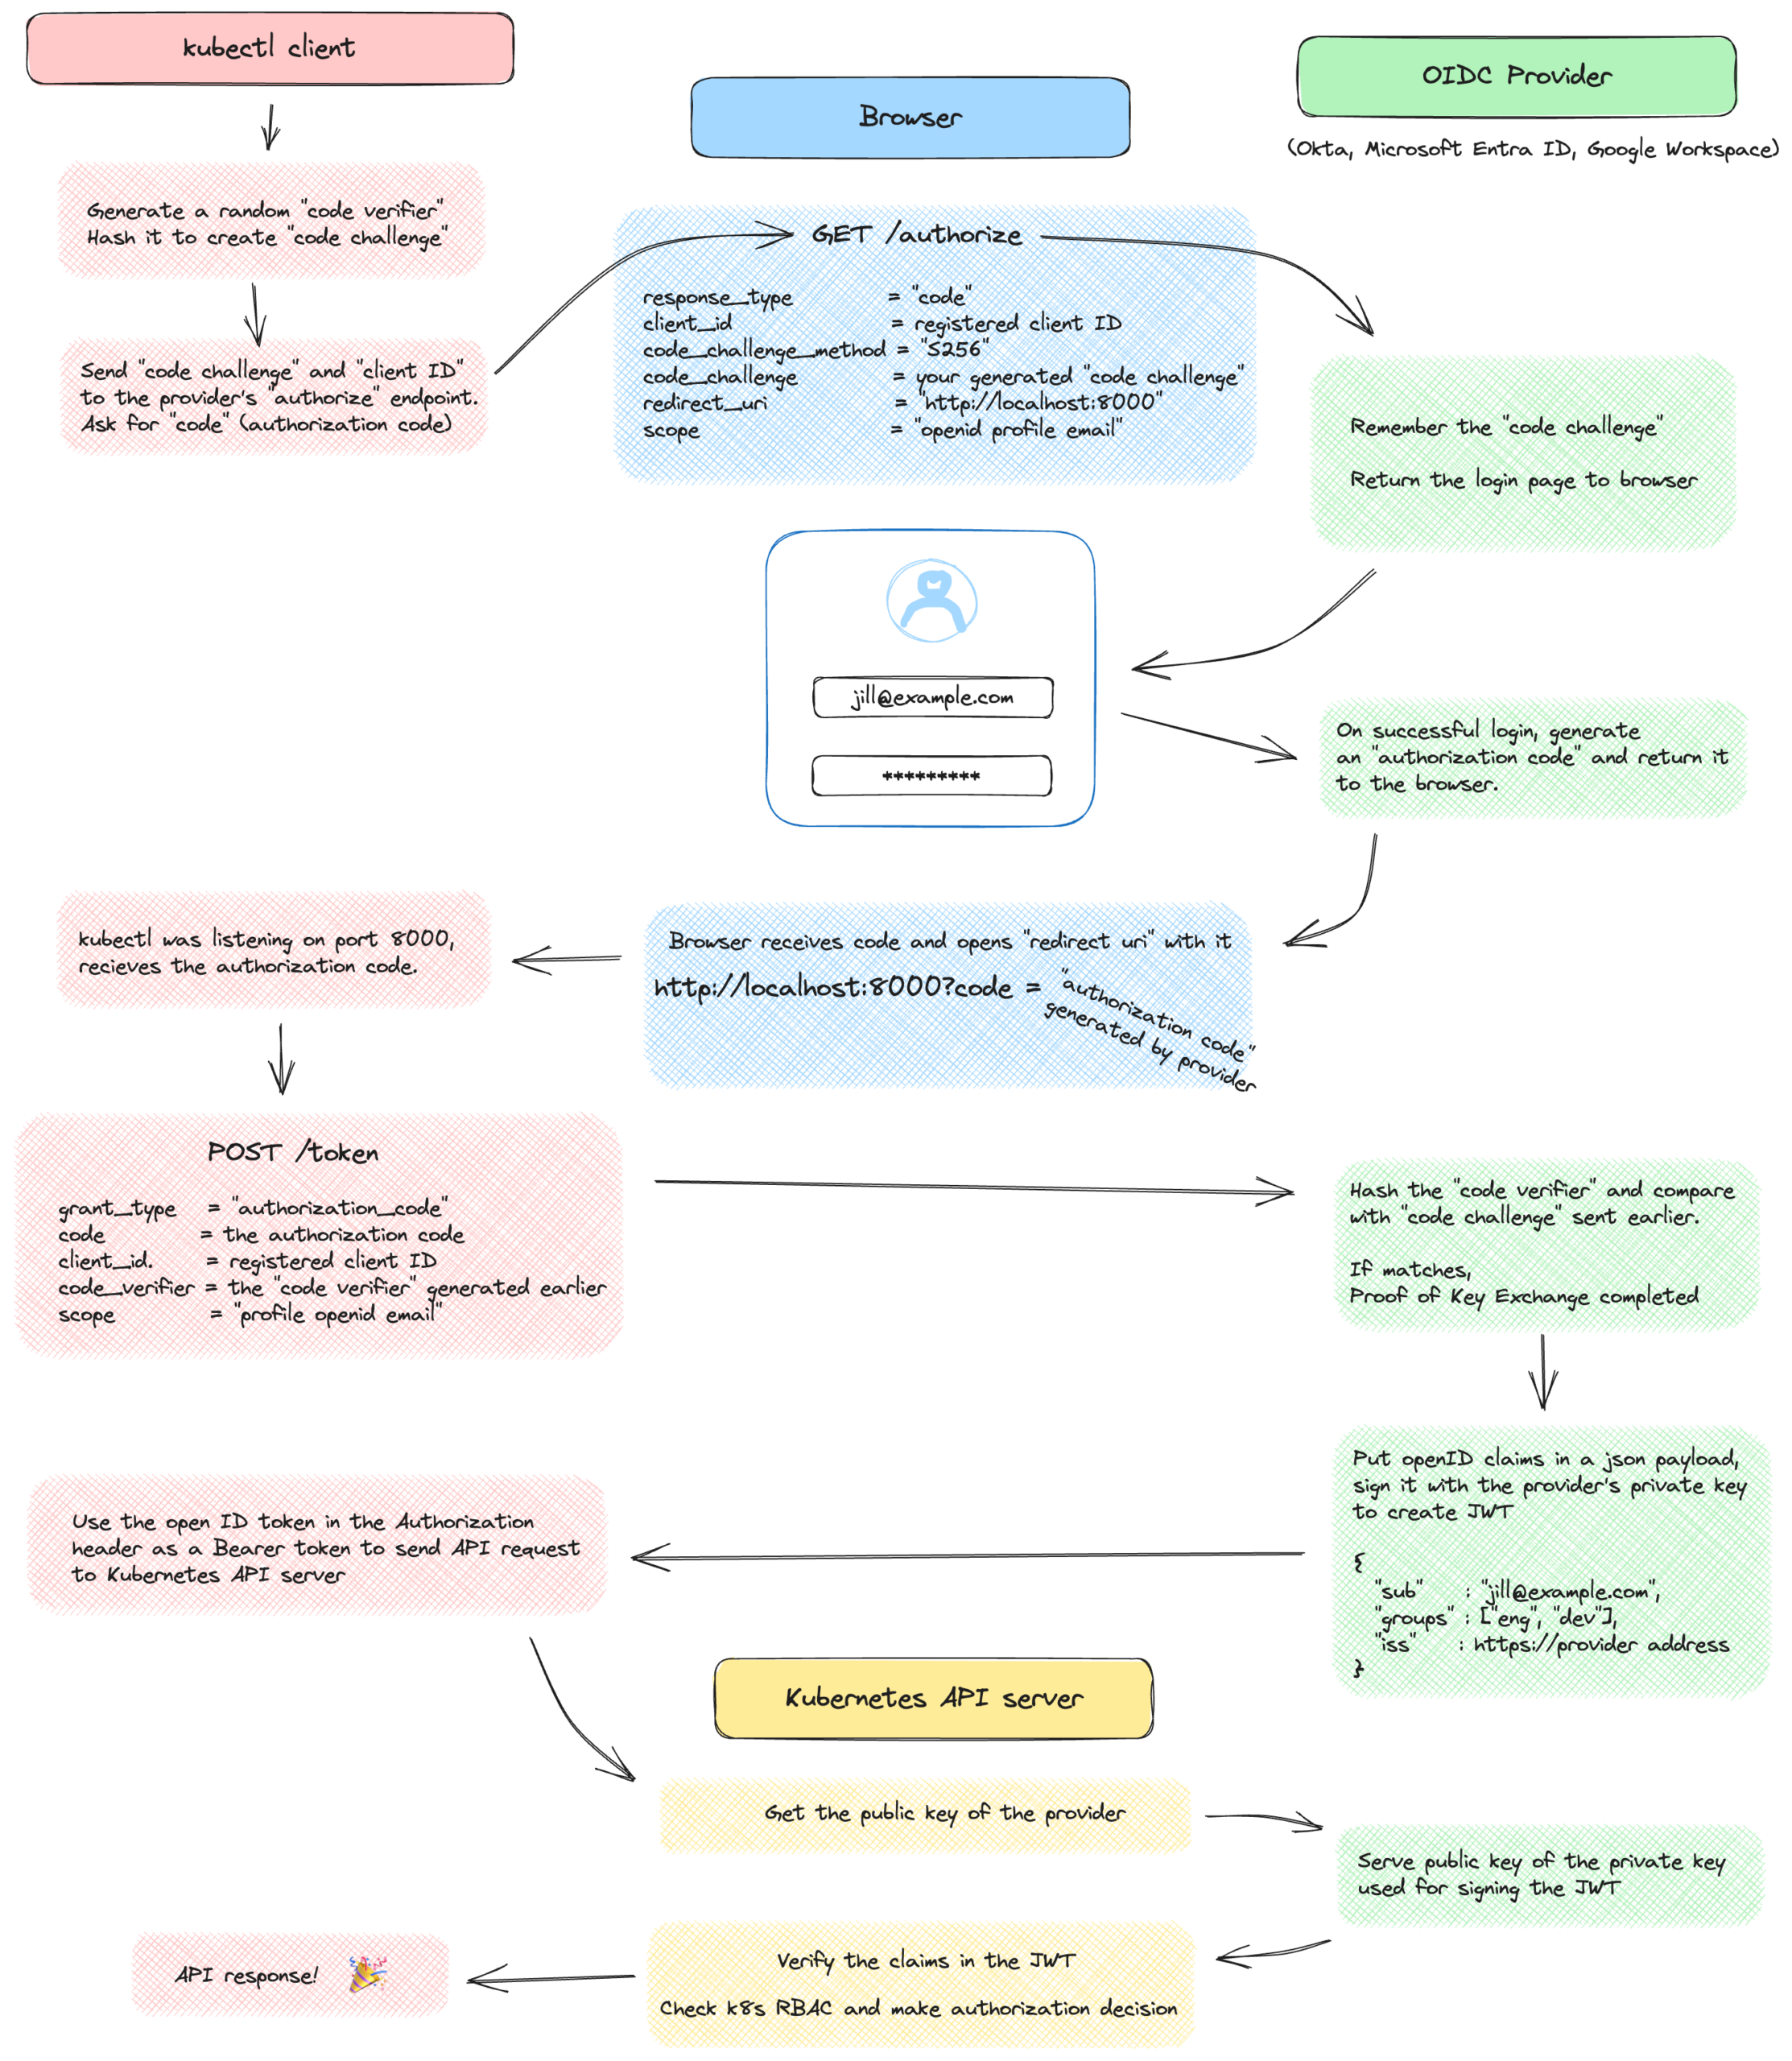
The Proof Key of Code Exchange (PKCE, pronounced “pixy”) is an extension of the standard authorization code grant OAuth flow. It improves the security of the implicit flow, which is used by single-page applications (SPA) or native applications, that cannot keep a secret. The implicit flow is susceptible to attacks because the access token is returned to the redirect URI parameter, which is provided by the caller – potentially, an attacker. In the PKCE flow the client secret is replaced by a code verifier. The verifier is a random value that is hashed using the S256 method, and the hashed value is sent in the /authorize request in the code_challenge parameter. The IdP persists the code challenge. Later, the application calls the /token endpoint passing the un-hashed code_verifier parameter.
The IdP computes the challenge from the verifier and compares it with the code challenge already stored previously. This ensures that the entity that sent the /authorize request and the entity that is sending the /token request is the same. So if the redirect URI was somehow intercepted and the authorization code has fallen in the wrong hands, the /token call still fails because the attacker has no way of know the original code_verifier value. (Sources: portswigger.net, cloudentity.com, authlete.com)
The PKCE flow is explained in the context of Kubernetes in the diagram below.
Configure Application
We will need the application’s parameters from our IdP, and use these parameters to configure OIDC in the Kubernetes cluster. Regardless of IdP, the parameters are the following:
issuer: this is the address Kubernetes will contact to obtain the IdP’s public key to verify the identity token
client ID: a unique identifier of the application. If you want to treat different Kubernetes clusters as different applications, then a new application and a new client ID should be generated for each cluster.
client secret: Google Workspace requires a client secret. This is omitted for other IdPs.
user claim: “email” for all IdPs
groups claim: “groups” for all IdPs
Okta
In the Okta admin dashboard, choose “Applications” → “Application” → “Create App Integration”. Then select “OIDC – OpenID Connect” and “Native Application” options.
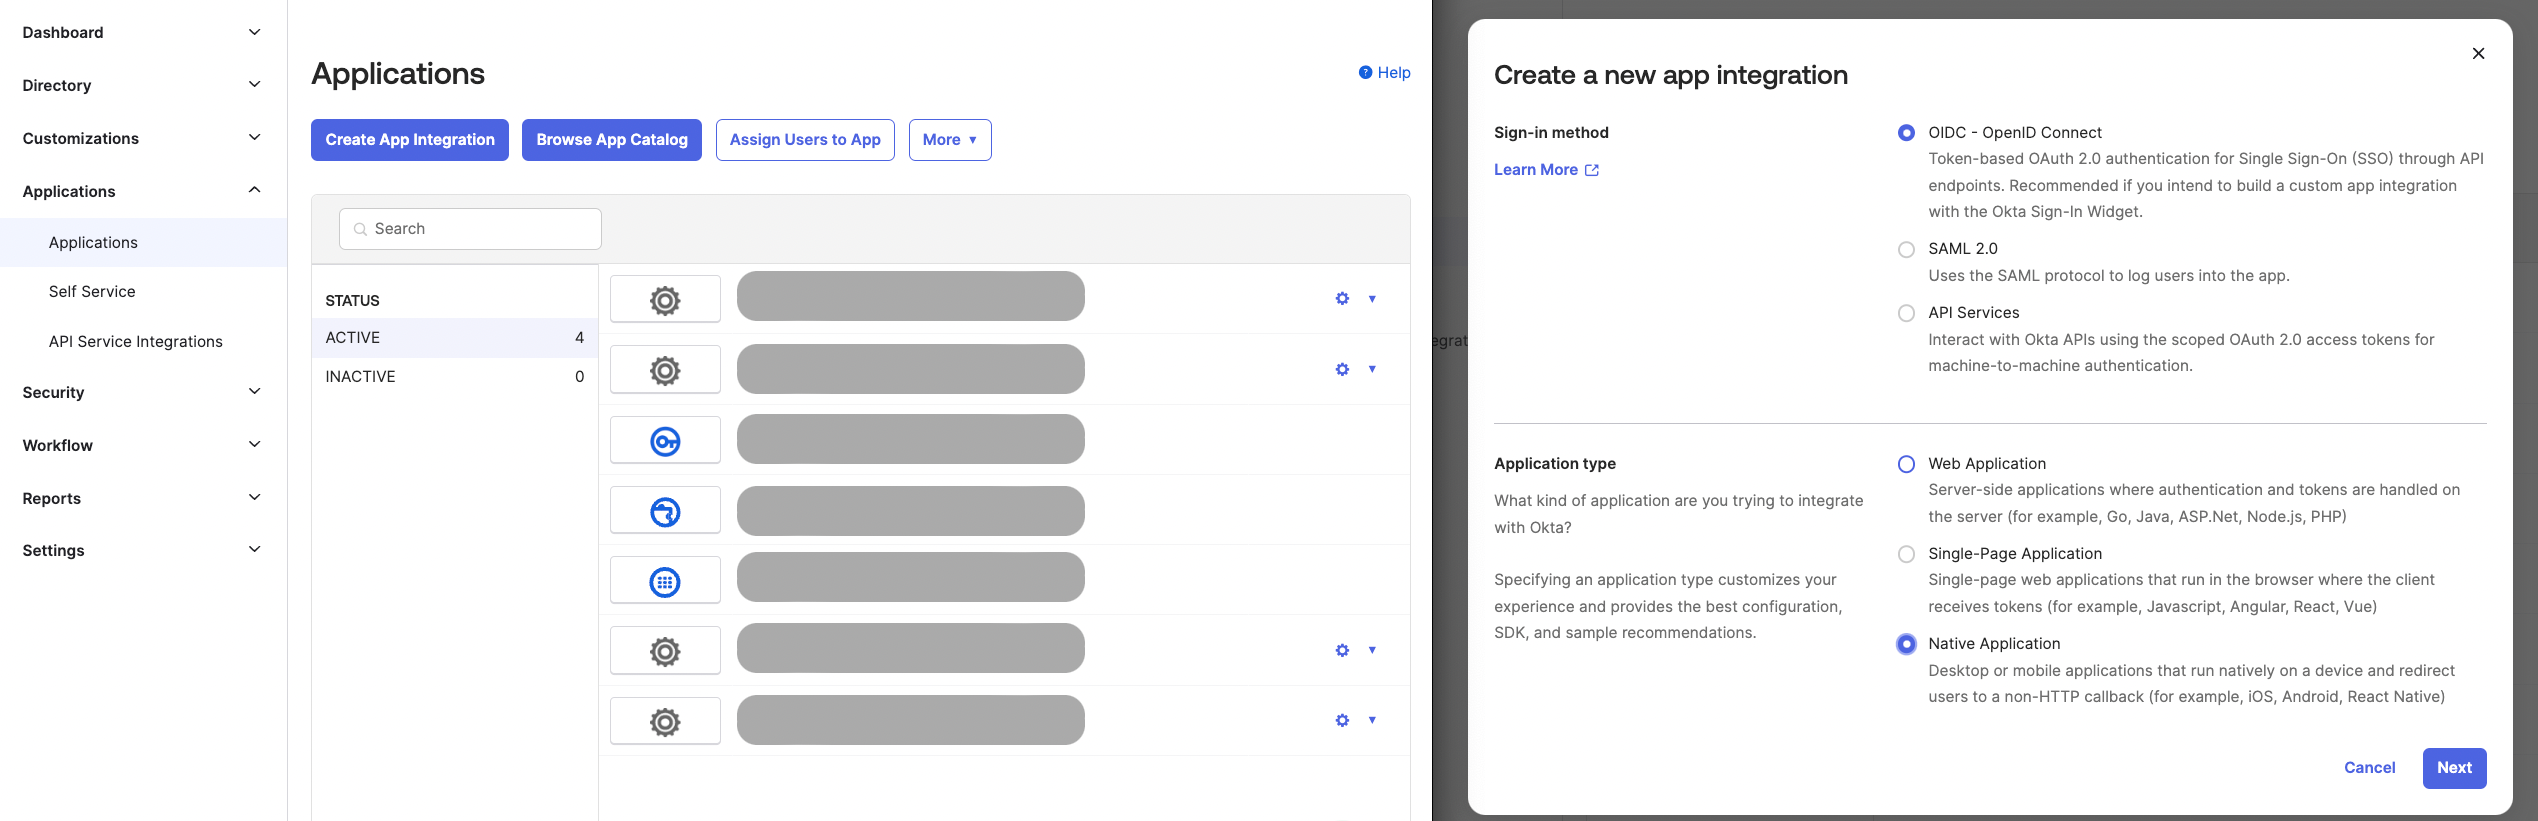
Configure the application with “None” as the “Client authentication” and check the “Require PKCE as additional verification” box. Leave only the “Authorization Code” grant type checked.
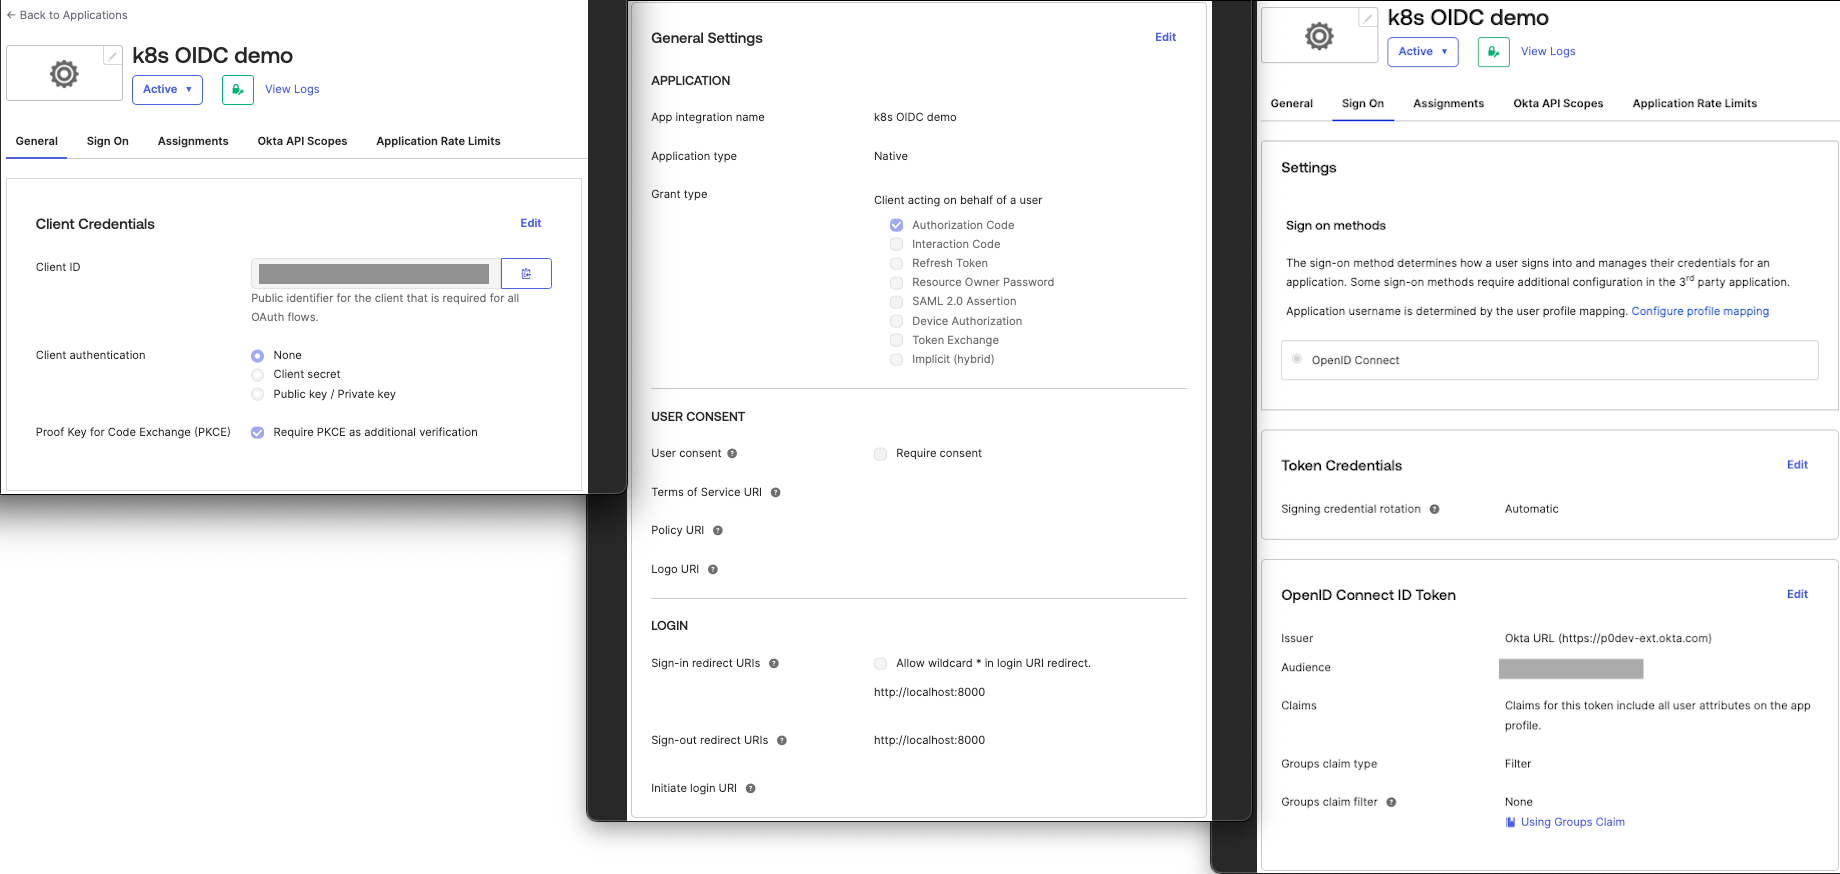
The “Issuer” in the OIDC configuration is going to be the URL of the authorization server that serves the OAuth 2.0 endpoints.
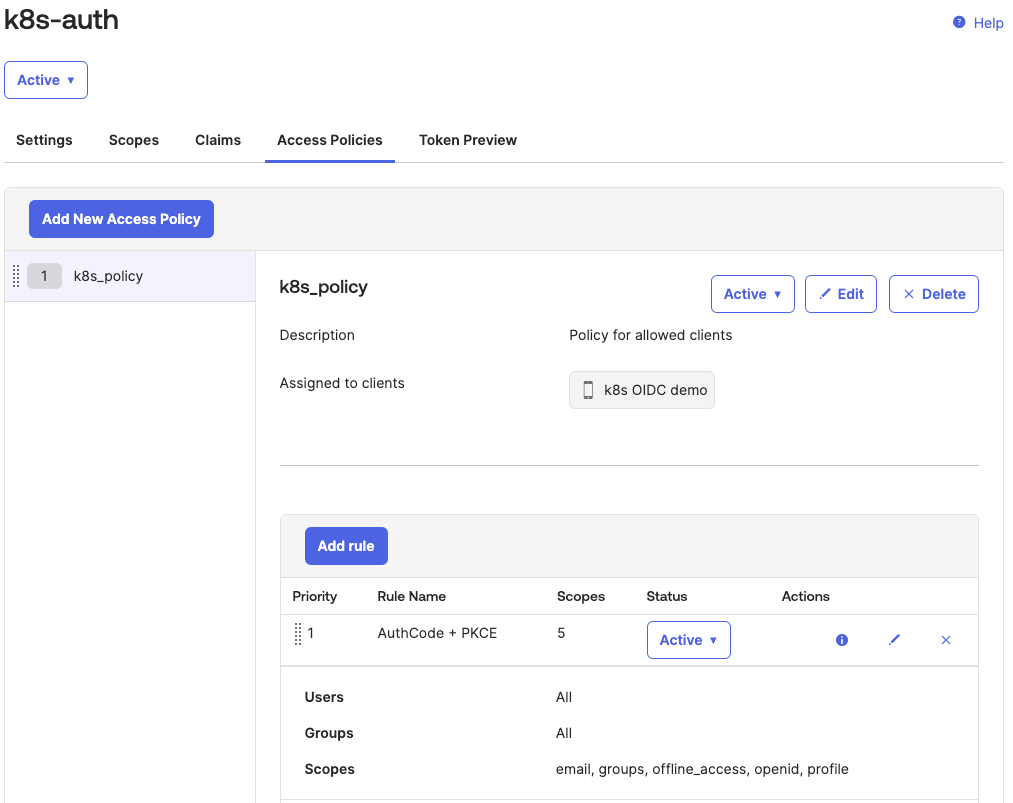
To configure the correct claims, and to isolate Kubernetes login from other types of access, we define a custom Authorization Server in Okta on the “Security” → “API” → “Authorization Servers” page:
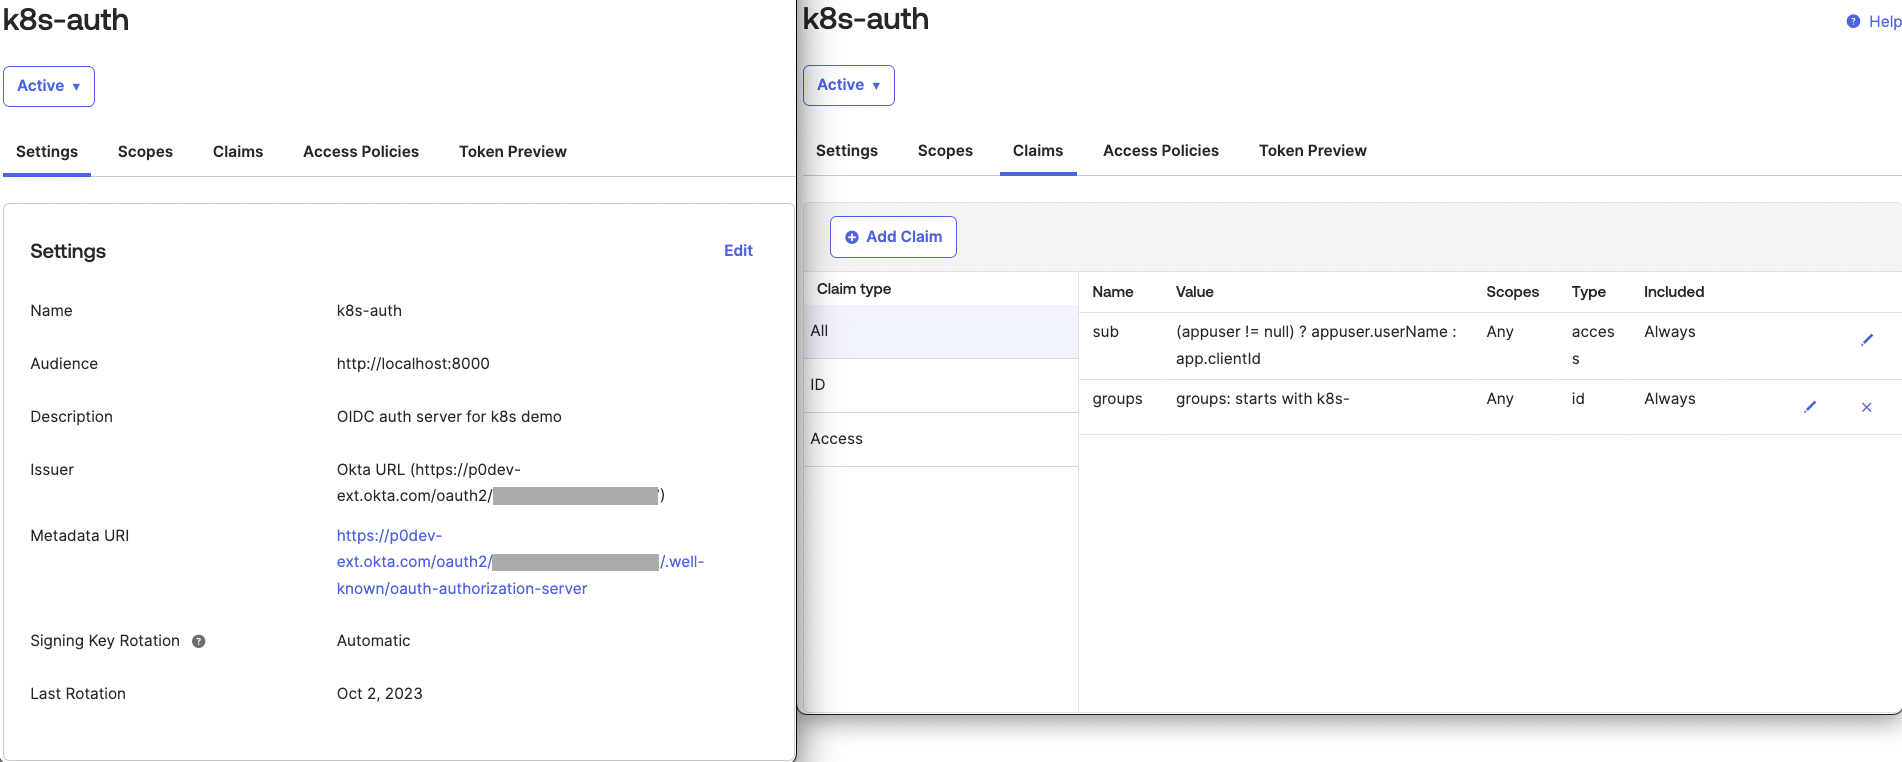
In Okta, the sub claim is a user ID, which is not convenient for defining RBAC in Kubernetes, because we would have to enter this random ID as the subject in the RoleBinding object. Instead, in the Kubernetes cluster configuration, we can instruct the OIDC plugin to use the email claim to identify a user instead. In Okta, the application’s Access Policy rules must allow the email scope:
The groups claim is tied to a custom groups scope, which is not present by default:
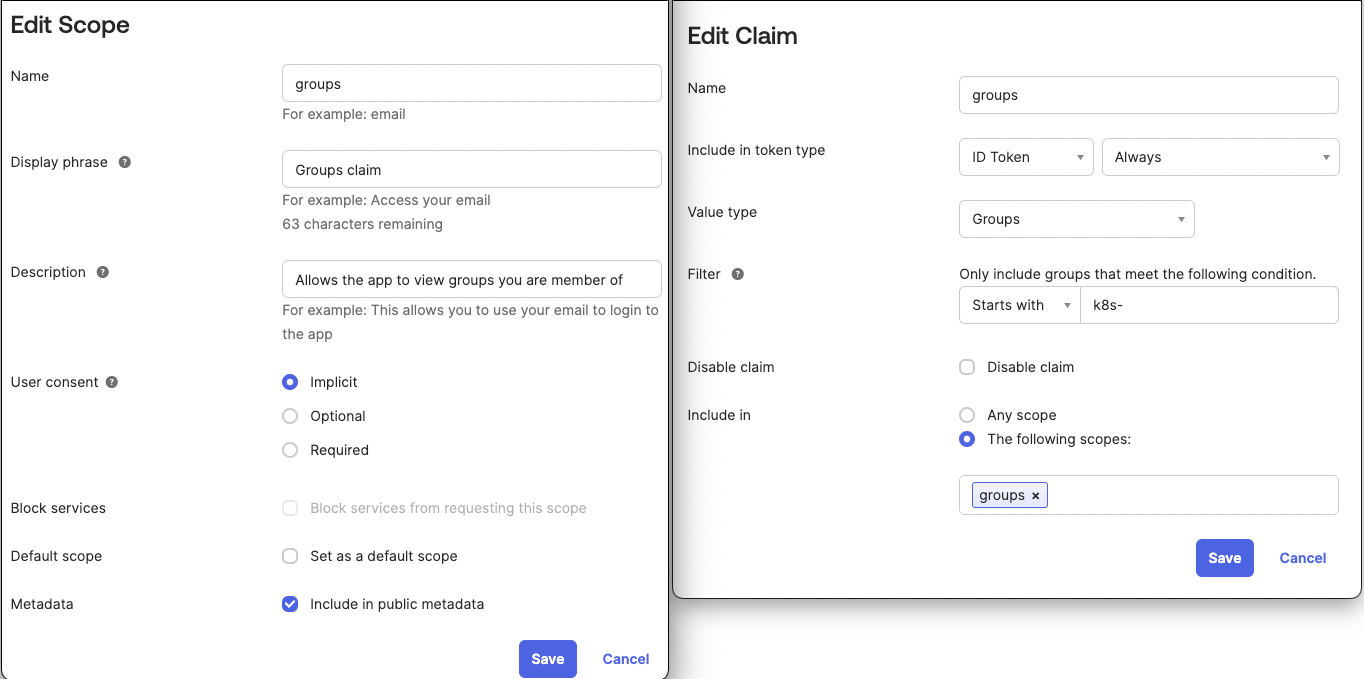
Also note, that we configured that only groups prefixed with k8s- are going to be passed in the groups claim. This is to avoid adding groups that are not related to Kubernetes.
Microsoft Entra ID
(previously Azure Active Directory)
We use the “Desktop app that calls web APIs” from the supported authentication flows in the documentation. The “Mobile and desktop applications” platform setting allows the PKCE flow and does not require a secret.
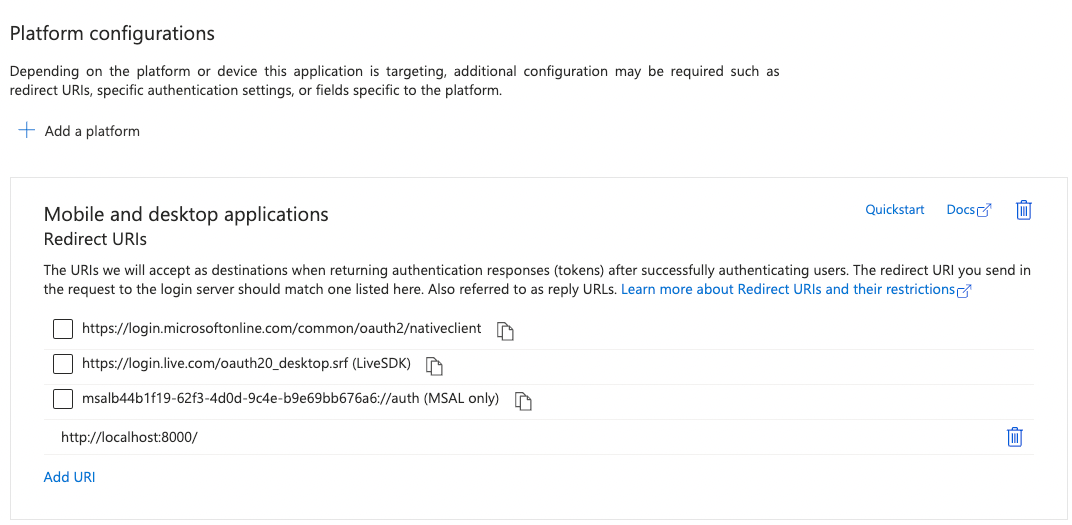
The Microsoft documentation advertises the “Single-page application” platform setting to be used with PKCE. For kubelogin this won’t work because it requires the correct CORS Origin header to be sent to the /authorize endpoint.

“Mobile and desktop applications” and “Web” platforms also support PKCE.
The other gotcha with Microsoft is that the OpenID Connect discovery document published under https://login.microsoftonline.com/{tenantId}/v2.0/.well-known/openid-configuration does not include the code_challenge_methods_supported property, and some clients, like kubelogin used in this article, cannot auto-discover the PKCE flow. To work around that, we will use the force-pkce argument in kubelogin.
Claims
The claims reference suggests using the oid or the sub field as the user identifier. It explicitly advises against using email, username, or preferred_username because they are mutable. On the other hand, oid and sub fields are very inconvenient to configure in a RoleBinding because they are random numeric IDs. Example claim:
{
"aud": "c44b1f19-...",
"iss": "https://login.microsoftonline.com/{tenantId}/v2.0",
"iat": 1697421579,
"nbf": 1697421579,
"exp": 1697425479,
"groups": [
"8a8dcf11-8629-4d60-9d00-b48e27d5afc8",
"7162ac13-5d2c-4f5e-aacc-da9f4f19a905",
...
"9b469762-902f-4df5-8573-c584809e6640"
],
"name": "John Smith",
"nonce": "qXu...M",
"oid": "63419c9a-f9a9-4b70-ba40-19e68c23d24c",
"preferred_username": "john.smith@example.com",
"rh": "0.AVkBIDdDh4Zd-EW4H6kqBH2F6hkfS7TzYg1NnE655pu2dqadAJg.",
"sub": "iMWPm2Vu2BnE9oJ3kZMwuNikQD99MOJOlAj0Lzf__oc",
"tid": "83433721-5d86-45f8-b81f-a92af47d85ea",
"uti": "7OCmTU_V2EK8erPRbgnyAA",
"ver": "2.0"
}
Instead of oid or sub we can use the preferred_username claim which is equal to the userPrincipalName (UPN) property of the user in the v2 version of the API. The UPN is the identifier used when signing in to Azure. While it is mutable, and over time another user may have the same UPN, it is unique at any specific point in time. This is comparable to user email in Okta and in Google Workspace.
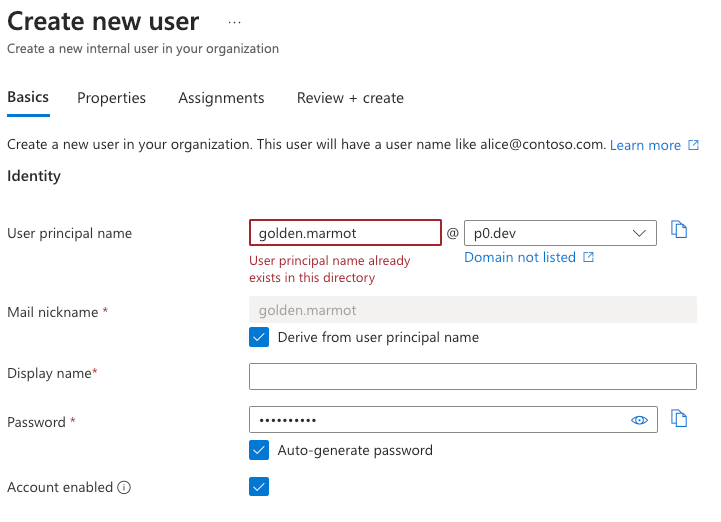
The Azure email property behaves in a similar way: you cannot add the same email address to two users. However, the email field is not a required attribute in Azure, and will not be returned among the claims if it doesn’t exist.
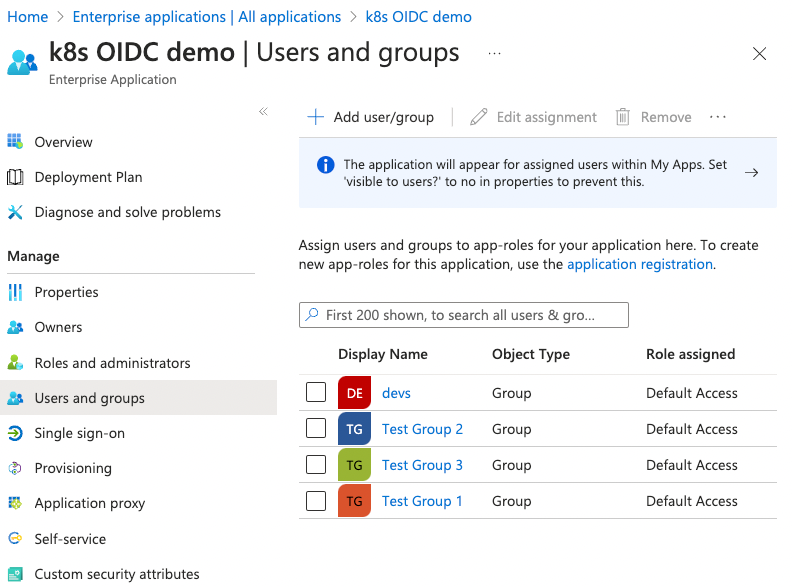
The groups claim returns the objectID attribute of the group, which is hard to consume for creating RoleBindings. In addition, the number of groups returned is limited to 200. To mitigate that, we can either assign a specific list of groups to our application or use group filtering. However, group filtering doesn’t allow the application to return the display name of groups. The only way to have the app return group names instead of object IDs in the id_token is to assign groups to the application. Then only those groups will be returned in the id_token that are assigned to the app as well as the authenticated user.
Note that the user assignment UI is available through the Enterprise applications page and is not available through the App registrations page.
Google Workspace
Create a new Google Cloud project and make it INTERNAL. You can do this on your consent page.
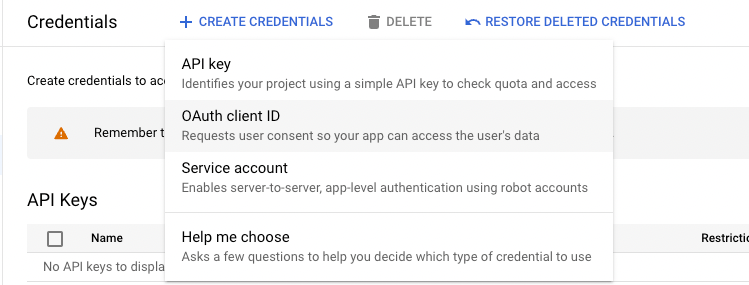
Create a new OAuth client ID on the Credentials page of your GCloud project by clicking + CREATE CREDENTIALS.
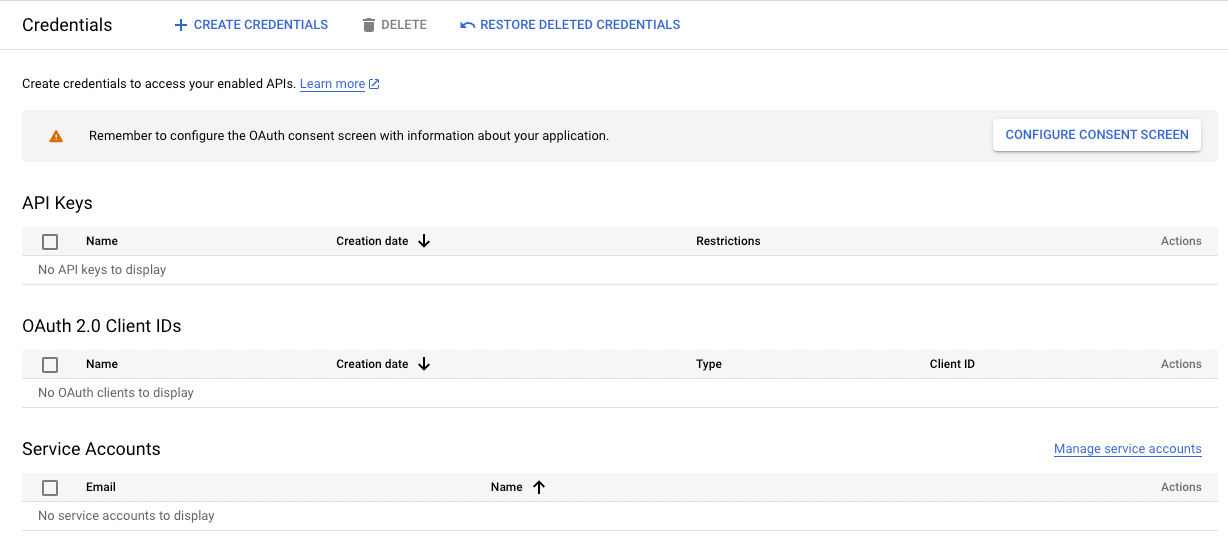
Note down the client ID – we will need it as input when configuring the OIDC on the Kubernetes cluster.
The issuer is fixed, https://accounts.google.com, which be found in the OpenID Discovery document, which is also fixed: https://accounts.google.com/.well-known/openid-configuration
Set up the OAuth client ID according to the docs for Mobile & Desktop Apps as a Desktop App.
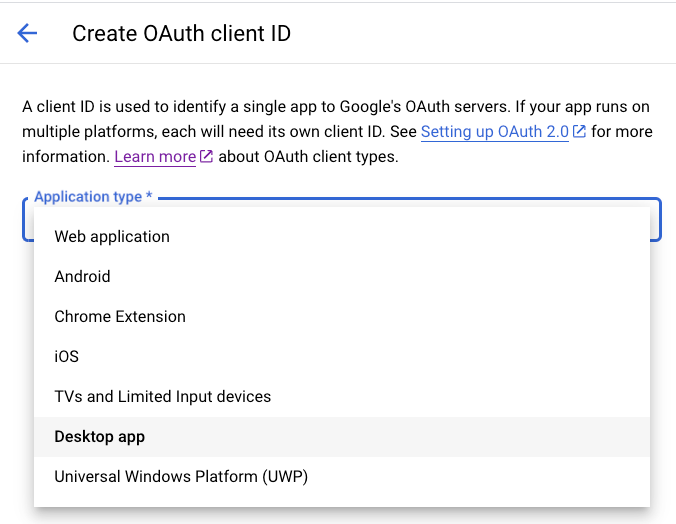
This flow is the most suitable because it assumes the clients (developer machines, in our case) cannot keep secrets. It supports Proof-of-Key-Exchange (PKCE). Unfortunately, as long as the created credential generates a Client Secret, Google will enforce that it is passed when we call the /token endpoint. To work around that, we could create an iOS app or Android app credential, which only generates a Client ID and no Client Secret. The problem with that approach is that loopback addresses are not supported as a redirect URI for the iOS and Android app credential.
As a result, we are left with the Desktop App setup that will enforce client secrets even in a PKCE flow.
JumpCloud
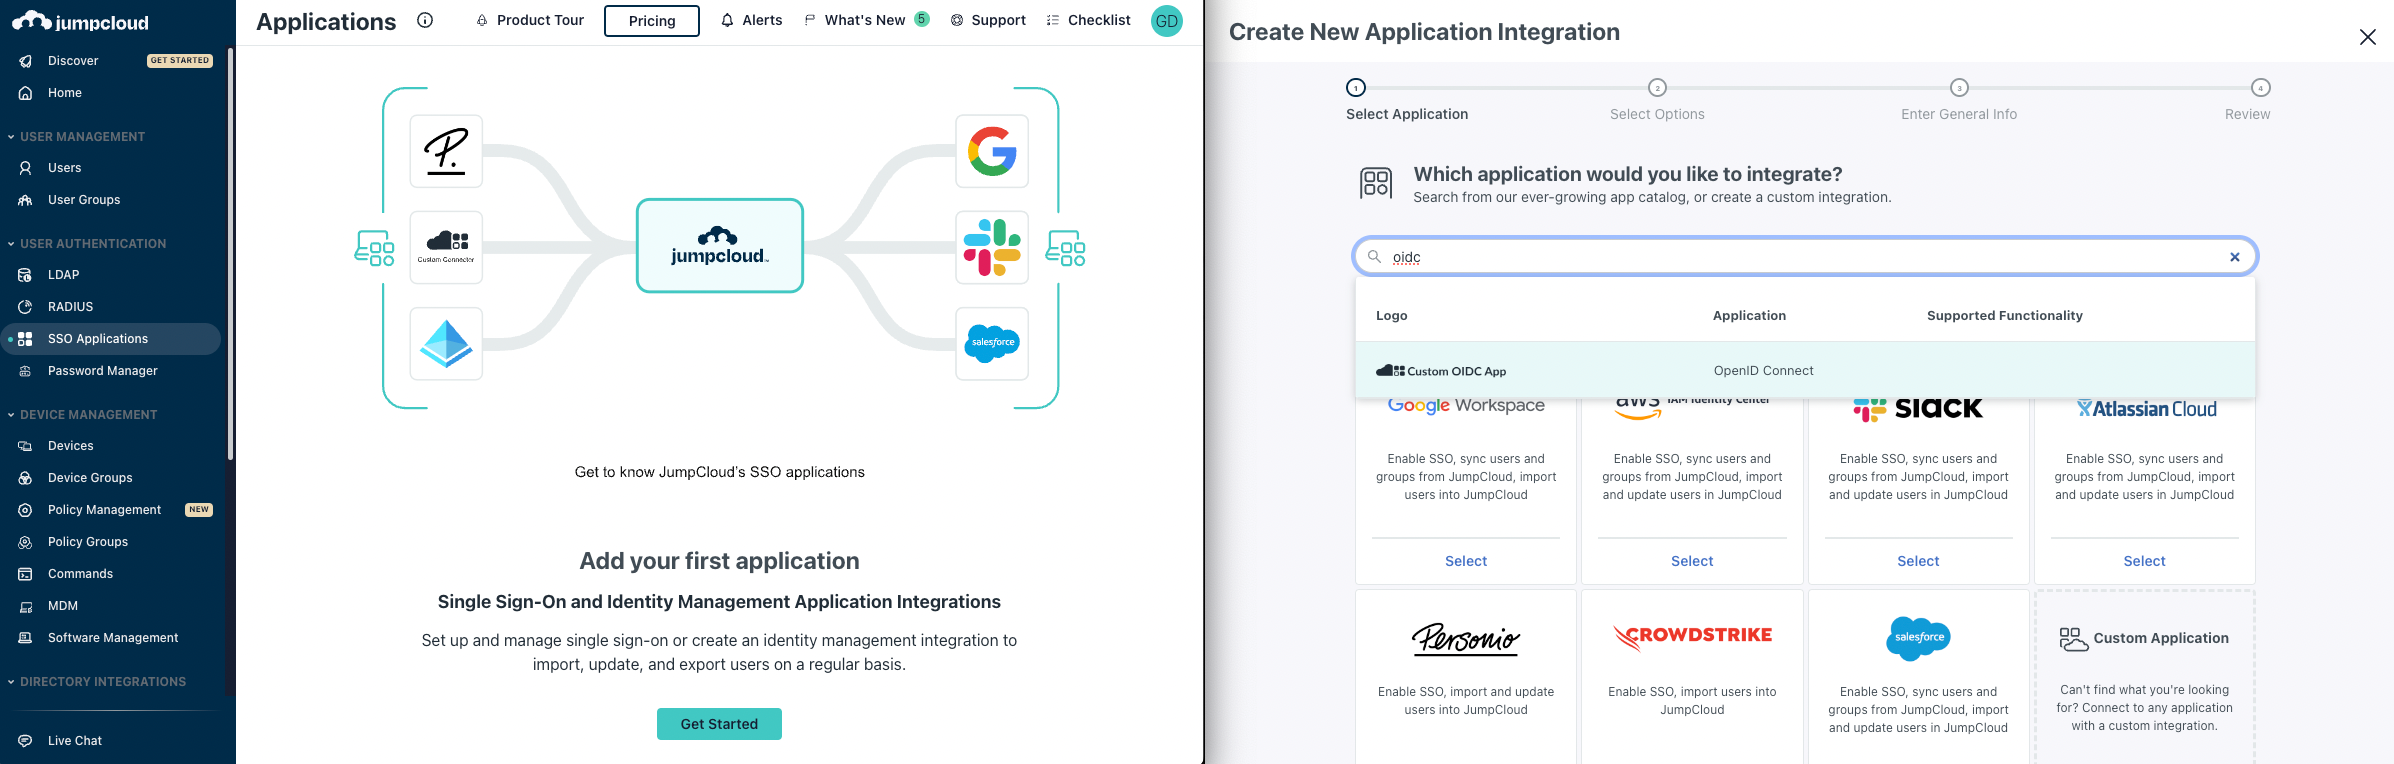
Start by adding a new application in the “SSO Applications” menu. Search for “OIDC”, and select “Custom OIDC App”:
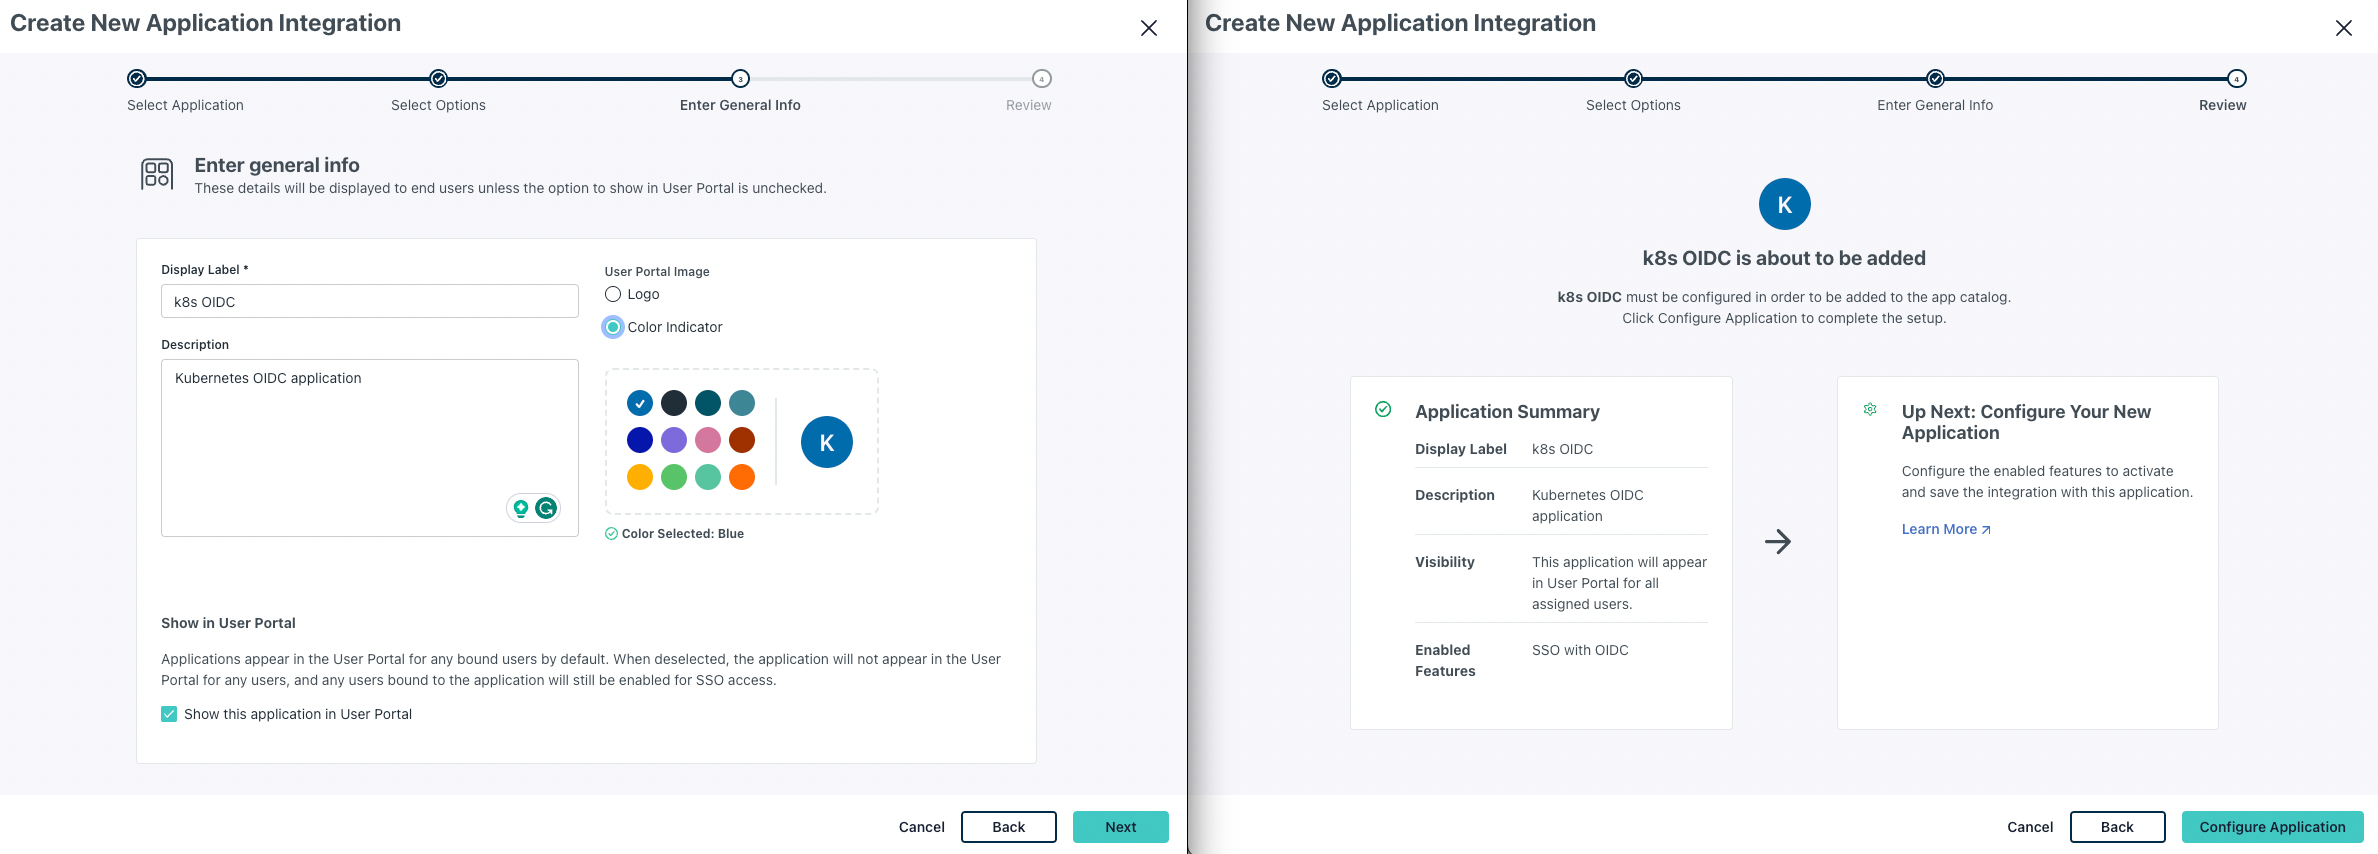
Enter general info and confirm on the review screen:
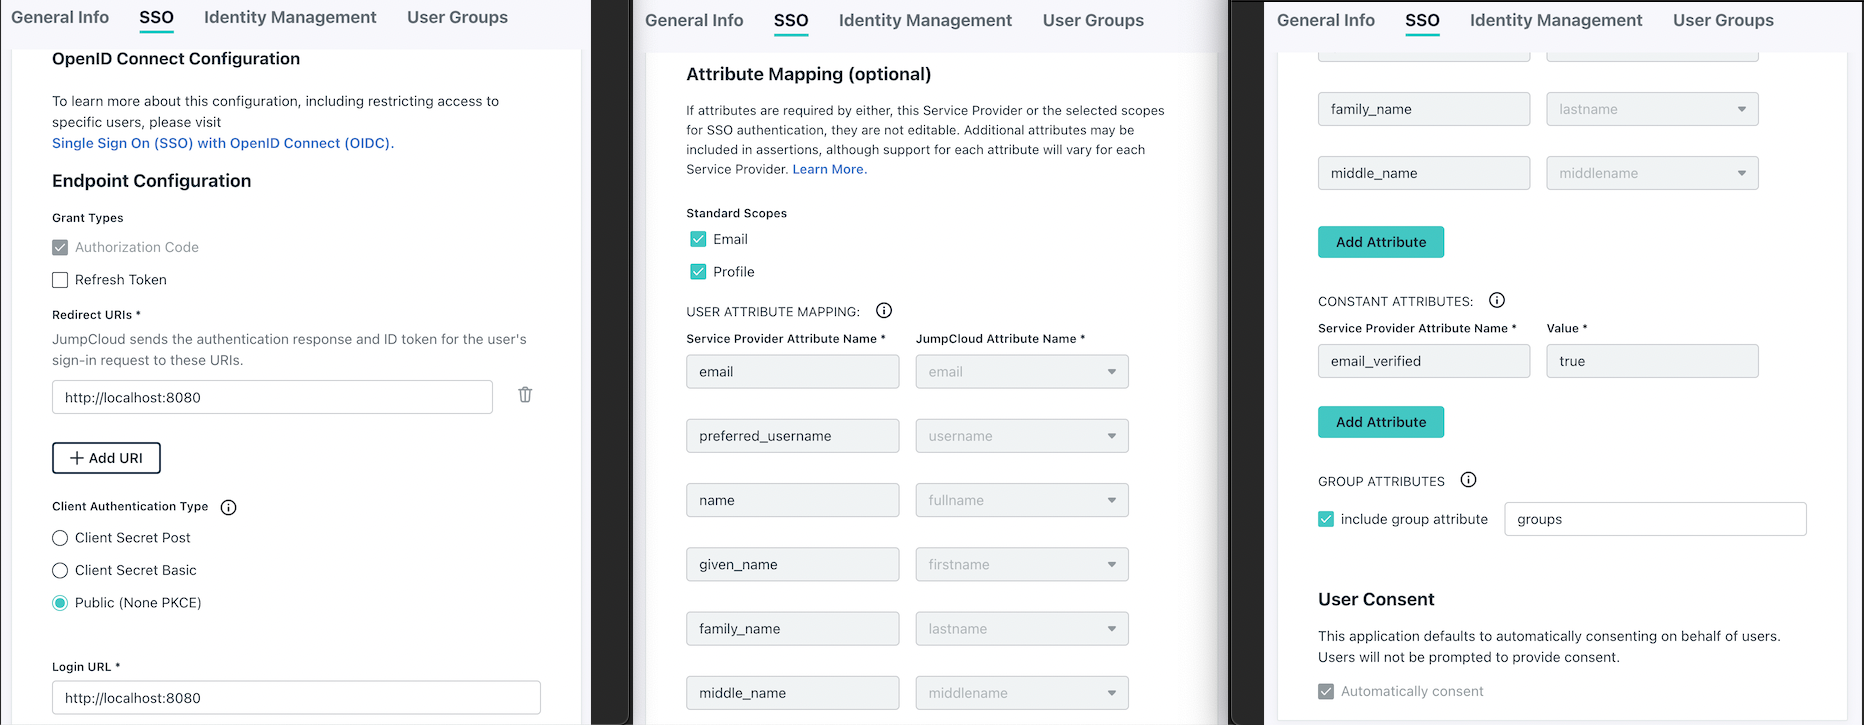
On the Application page, select the “SSO” tab. Configure the following:
- Check “Authorization Token” and uncheck “Refresh Token”
- “Client Authentication Type” is “Public (None PKCE)”
- Add
http://localhost:8080as the “Redirect URI” – note, the scheme ishttp
- The “Login URL” isn’t relevant, since there is no a service-provider initiated login flow. Enter
http://localhost:8080as well since the field is required.
- In the “Attribute Mapping” section check “Email” and “Profile”
- Check “Include group attribute” and name the attribute as
groups
Click “activate”. Save the client ID in the popup that follows.
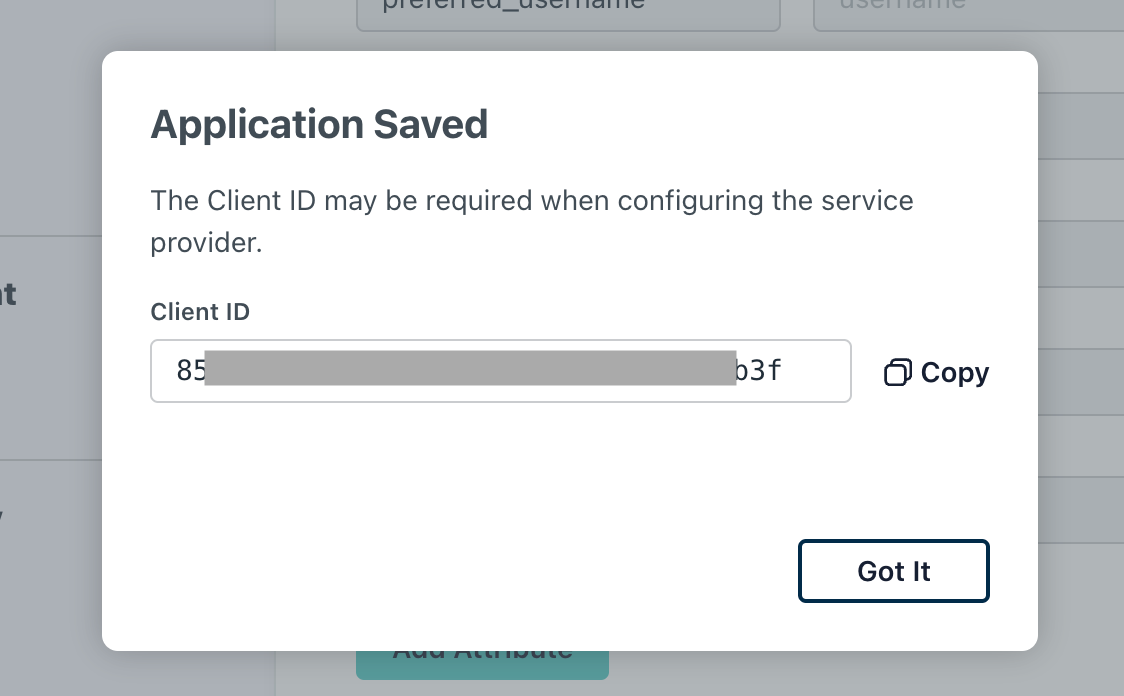
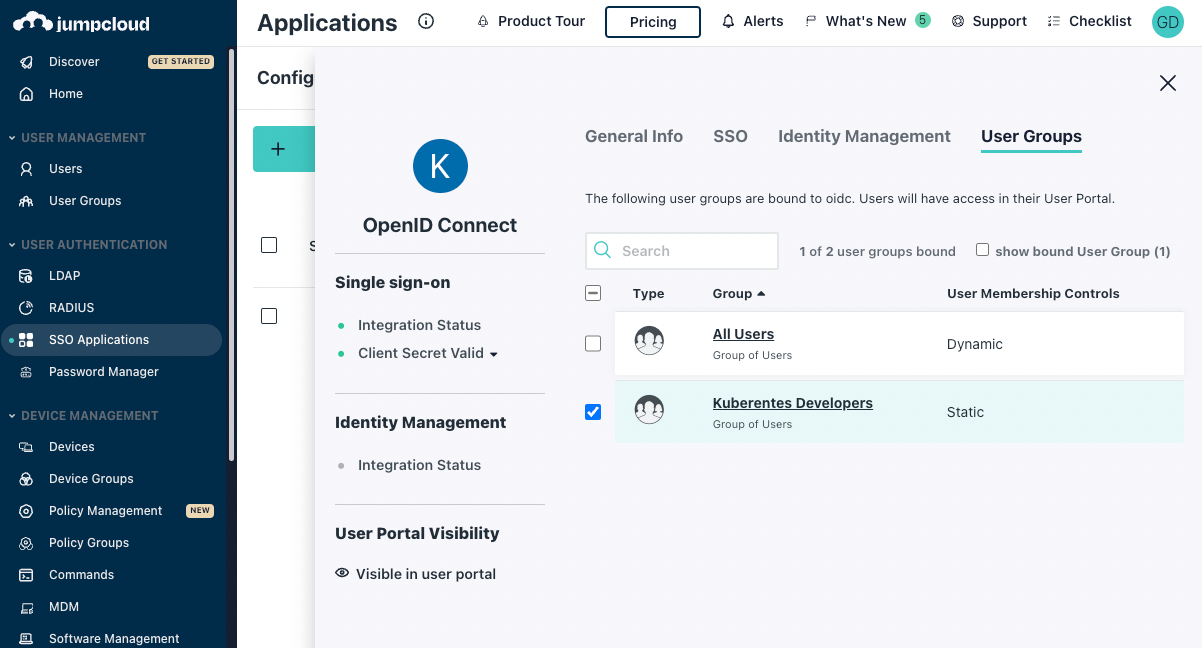
After clicking “Got It”, open the application again and select which groups you want to enable the Kubernetes OIDC application for:
When using JumpCloud, the issuer in the OIDC configuration is https://oauth.id.jumpcloud.com.
Step 2: Configure the Kubernetes Cluster
The IdP configuration parameters that the Kubernetes cluster must know about are:
- Issuer: in addition to the OAuth 2.0 endpoints, must also support OpenID Connect Discovery. All identity providers featured in this article support OIDC Discovery.
- Client ID: generated by the identity provider
- User claim: which JWT claim contains the value that is used as the user in Kubernetes
- Group claim: which JWT claim contains the value that is used as the group in Kubernetes
In addition, you can configure a prefix to differentiate users logged in via OIDC from users logged in via other methods:
- User prefix: we use a different prefix for each OIDC provider.
okta:for Okta,google:for Google Workspace, andms:for Microsoft Entra ID.
- Group prefix: set to the same as user prefix
If prefixes are configured, the role binding in Kubernetes must contain the prefixed user or group name. With a user prefix = "okta:” and a group prefix = "okta:” the original role binding example becomes:
kind: RoleBinding
subjects:
- kind: User
name: okta:jane
- kind: Group
name: okta:engineers
roleRef:
name: pod-reader
AWS Elastic Kubernetes Service
Configure an identity provider using the CLI (docs):
AWS_REGION=${region} aws eks associate-identity-provider-config --cluster-name=${cluster} --oidc "identityProviderConfigName=OidcDemoConfig,issuerUrl=${issuer},clientId=${clientId},usernameClaim=email,usernamePrefix=${prefix},groupsClaim=groups,groupsPrefix=${prefix}"
Note that only one identity provider can be associated with a cluster currently. If you have an existing identity provider configured, that must be disassociated first.
Google Kubernetes Engine (GKE)
The Kubernetes cluster we use for this article is a private cluster with public API access enabled. Within that, we configured a private cluster with “Public endpoint access enabled, authorized networks disabled”. It’s a good idea to first create the GKE cluster with an external API endpoint. This allows for easier setup and troubleshooting as you set up OIDC. We can authenticate with standard Google auth. Once the setup is complete you can make the cluster API private.
Configuring an external identity provider requires enabling the Kubernetes “Identity Service” with --enable-identity-service flag on the cluster (See here) and changing the default settings to fit our networking setup. The first step, enabling the identity service, can only be done from the GCloud CLI since Google Kubernetes Engine (GKE) doesn’t support modifying the Kubernetes startup options beyond those exposed in the CLI.
OIDC in GKE is different from the standard OIDC configuration provided by Kubernetes. GCloud uses the envoy service, which is deployed inside the cluster. After enabling the identity service, you should see:
$ kubectl get services -n anthos-identity-service
NAME TYPE CLUSTER-IP EXTERNAL-IP PORT(S) AGE
gke-oidc-envoy LoadBalancer 1.1.1.125 1.1.1.91 443:32031/TCP 9m
gke-oidc-service ClusterIP 1.1.1.17 <none> 8443/TCP,10390/TCP 9m
By default, this service is not exposed to the internet and ODIC authentication will not work without making three changes to the default configuration.
1. Configure Ingress on the Load Balancer
If we want the API server to be public, we need two changes compared to the default setup that GCloud creates:
Default:
metadata:
annotations:
cloud.google.com/load-balancer-type: Internal
cloud.google.com/neg: '{"ingress":true}'
Updated:
metadata:
annotations:
cloud.google.com/load-balancer-type: External
cloud.google.com/neg: '{"ingress":true,"exposed_ports": {"443":{}}}'
You can update the the Load Balancer using by creating an envoy-service-patch.yaml file with the contents above and executing:
kubectl patch service gke-oidc-envoy -n anthos-identity-service --type merge --patch-file envoy-service-patch.yaml2. Configure Egress on the Cluster
The cluster also requires outgoing internet connection to the IdP to query the OpenID Discover URI. This means we must set up Network Address Translation and a Cloud Router following the steps in the GKE documentation.
3. Prepare for Credential Distribution
Before distributing the client config to developers, update the properties in the ClientConfig object default in the kube-public namespace. This configuration is created automatically when you enable the Anthos identity service. The default generated config doesn’t suit our needs:
apiVersion: authentication.gke.io/v2alpha1
kind: ClientConfig
metadata:
name: default
namespace: kube-public
spec:
certificateAuthorityData: <redacted>
name: oidc-demo-gke-cluster
server: https://1.1.1.1:443
We have to add our desired authentication section to the spec:
spec:
authentication:
- name: oidc
oidc:
clientID: ${clientId}
cloudConsoleRedirectURI: https://console.cloud.google.com/kubernetes/oidc
extraParams: prompt=consent
issuerURI: https://p0dev-ext.okta.com/oauth2/${audience}
kubectlRedirectURI: http://localhost:8000
scopes: openid,profile,email,groups,offline_access
userClaim: email
groupsClaim: groups
userPrefix: "${prefix}"
groupPrefix: "${prefix}"
You can update the Load Balancer using by creating an client-config-patch.yaml file with the contents above and executing:
cliendId=YOUR_CLIENT_ID audience=YOUR_AUDIENCE prefix=YOUR_PREFIX envsubst < $(echo client-config-patch.yaml) > client-config-patch.yaml.tmp kubectl patch clientconfig default -n kube-public --type merge --patch-file client-config-patch.yaml.tmp rm client-config-patch.yaml.tmp
Troubleshooting
- Add the
-v=1option to the kube config:
kubectl config set-credentials ... --exec-arg=-v=1- Inspect the logs of the pods of the
gke-oidc-servicein theanthos-identity-servicenamespace. Three pods are deployed, to view logs from all pods:
kubectl logs --tail 500 -l k8s-app=gke-oidc-service --all-containers -n anthos-identity-serviceAzure Kubernetes Service
AKS currently doesn’t support adding an external OpenID Connect Provider. This issue is tracked here.
Step 3: Configure Developer Access
After setup is complete, the developer experience is the following:
- Any kubectl command will automatically trigger the login flow if the user is not authenticated:
kubectl get pods- The browser opens your IdP’s login page. If credentials are still cached in the browser developers don’t have to provide password / MFA again.
- After successful authentication the browser will display:
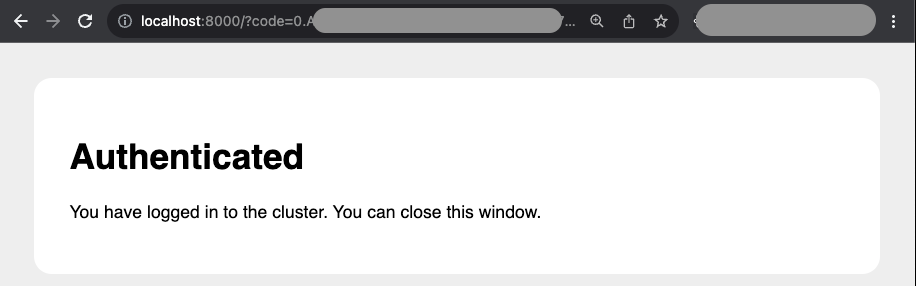
- The command
kubectlcommand in the CLI is automatically executed after successful login.
Setup Instructions
- Engineers must install the
kubeloginKubernetes client plugin. For example, on a Mac:
By installing this plugin the kubectl oidc-login command will alias the kubelogin binary.
- Engineers must configure the client the plugins with the appropriate arguments. Distribute the instructions on how to do that, which depends on the cloud provider where the cluster is hosted.We describe the commands below, and you can also find handy scripts to generate these commands automatically from your Terraform state in the accompanying repository.
AWS
Collect cluster information and update the kube config file
cluster=OidcDemoCluster
region=us-west-2

idpConfig=$(aws eks describe-identity-provider-config --region $region --cluster-name $cluster --identity-provider-config type=oidc,name=OidcDemoConfig --output json)

issuer=$(echo $idpConfig | jq -r .identityProviderConfig.oidc.issuerUrl)
clientId=$(echo $idpConfig | jq -r .identityProviderConfig.oidc.clientId)
server=$(aws eks describe-cluster --region $region --name $cluster --query "cluster.endpoint" --output text)
caData=$(aws eks describe-cluster --region $region --name $cluster --query "cluster.certificateAuthority.data" --output text)

kubectl config set-credentials ${cluster} --exec-command=kubectl --exec-api-version=client.authentication.k8s.io/v1beta1 \
--exec-arg="oidc-login" \
--exec-arg="get-token" \
--exec-arg="--oidc-issuer-url=${issuer}" \
--exec-arg="--oidc-client-id=${clientId}" \
--exec-arg="--oidc-extra-scope=openid profile email groups offline_access"

kubectl config set-cluster ${cluster} --server=${server}
kubectl config set clusters.${cluster}.certificate-authority-data "${caData}"

kubectl config set-context ${cluster} --cluster=${cluster} --user=${cluster}

kubectl config use-context ${cluster}
Google Cloud Platform (GCloud)
GCloud provides the gcloud container clusters get-credentials CLI command to store the cluster information in your local kube config. This command only works for standard IAM authentication, and will not work with OIDC.
Before distributing the client config to developers, update the properties in the ClientConfig object default in the kube-public namespace.
Then retrieve the ClientConfig from the k8s API server and extract the relevant information to set a new context in your kube config:
cluster=oidc-demo

clientConfig=$(kubectl get clientconfig default -n kube-public -o json)

issuer=$(echo $clientConfig | jq -r '.spec.authentication[0] | select(.name == "oidc") | .oidc.issuerURI')
clientId=$(echo $clientConfig | jq -r '.spec.authentication[0] | select(.name == "oidc") | .oidc.clientID')
clientSecret=$(echo $clientConfig | jq -r '.spec.authentication[0] | select(.name == "oidc") | .oidc.clientSecret')
server=$(echo $clientConfig | jq -r '.spec.server')
caData=$(echo $clientConfig | jq -r '.spec.certificateAuthorityData')

kubectl config set-credentials ${cluster} --exec-command=kubectl --exec-api-version=client.authentication.k8s.io/v1beta1 \
--exec-arg="oidc-login" \
--exec-arg="get-token" \
--exec-arg="--oidc-issuer-url=${issuer}" \
--exec-arg="--oidc-client-id=${clientId}" \
--exec-arg="--oidc-client-secret=${clientSecret}" \
--exec-arg="--oidc-extra-scope=openid profile email groups offline_access"

kubectl config set-cluster ${cluster} --server=${server}
kubectl config set clusters.${cluster}.certificate-authority-data "${caData}"

kubectl config set-context ${cluster} --cluster=${cluster} --user=${cluster}

kubectl config use-context ${cluster}
Troubleshooting
Check the claims returned by your IdP with the following command, replace values issuer and clientId from values in your kube config file:
kubectl oidc-login setup --oidc-issuer-url=${issuer} --oidc-client-id=${clientId} --oidc-extra-scope="openid profile email groups offline_access"
Returns the entire get-token response payload:
{
"sub": "1234456789",
"name": "John Smith",
"email": "john.smith@example.com",
"ver": 1,
"iss": "https://example.okta.com/oauth2/<REDACTED>",
"aud": "<REDACTED>",
"iat": 1697392001,
"exp": 1697395601,
"jti": "<REDACTED>",
"amr": [
"mfa",
"otp",
"pwd"
],
"idp": "<REDACTED>",
"nonce": "<REDACTED>",
"preferred_username": "john.smith@example.com",
"auth_time": 1697391436,
"at_hash": "<REDACTED>",
"groups": [
"k8s-oidc-demo-group"
]
}
Appendix
Execute the PKCE flow manually
You can execute the PKCE flow steps yourself. This can be used for verifying the behavior of the authorization server (the issuer). For instance, you may want to know if the the server truly implements PKCE and verifies the code_verifier. It should return an error message if the code_verifier does not match the code_challenge.
Below we provide a working example of manually executing the PKCE flow in Microsoft Entra ID, using the App Registration in this post.
The following input parameters are required:
| Parameter | Description |
|---|---|
| ISSUER | In Microsoft Entra ID, this is a URL which includes your tenant ID:https://login.microsoftonline.com/${tenantID}/oauth2/v2.0 |
| CLIENT_ID | The client ID – for Azure, find it under App registrations → your app → Overview |
| CODE_VERIFIER and CODE_CHALLENGE | Use an online generator like this one by Ping Identity |
| AUTH_CODE | The authorization code retrieved from the /authorize endpoint |
Other common parameters are nonce and state that are randomly generated values and provide additional security for certain attack types. For the purposes of this demonstration they are omitted.
1. /authorize
Open a terminal window and run a local web server in to listen to the callback URL where the authorization code will be sent to.
$ python3 -m http.server
Serving HTTP on :: port 8000 (http://[::]:8000/) ...
Construct the authorize URL, and open it in a browser. (Use another terminal window)
export ISSUER=
export CLIENT_ID=
export CODE_CHALLENGE=
export CODE_VERIFIER=
open $(echo "${ISSUER}/authorize?access_type=offline&client_id=${CLIENT_ID}&code_challenge_method=S256&code_challenge=${CODE_CHALLENGE}&redirect_uri=http%3A%2F%2Flocalhost%3A8000&response_type=code&scope=openid%20profile%20email" | envsubst)
Complete the login flow in the browser. Your browser will then redirect to http://localhost:8000 which is served by the local python web server. Copy the code from the browser and export it as the AUTH_CODE variable – in the same terminal that has your other environment variables.

export AUTH_CODE=<copied value>2. /token
Using the authorization code (AUTH_CODE) and the code verifier (CODE_VERIFIER) issue the second request, which is a POST to the /token endpoint of the issuer. This retrieves the open ID token which contains the claims that are used for authorization in Kubernetes.
curl -X POST "${ISSUER}/token" \
--form grant_type="authorization_code" \
--form code="${AUTH_CODE}" \
--form client_id="${CLIENT_ID}" \
--form redirect_uri="http://localhost:8000" \
--form code_verifier="${CODE_VERIFIER}" \
--form scope="profile openid email"
The response will be of the form:
{
"token_type": "Bearer",
"scope": "email openid profile",
"expires_in": 3764,
"ext_expires_in": 3764,
"access_token": "ey...XyHtA",
"id_token": "ey...Deaw"
}
To check if the issuer really enforces PKCE, you can use a wrong CODE_VERIFIER parameter in the /token request. In this case you should see an error message. In Microsoft Entra ID:
{
"error": "invalid_grant",
"error_description": "AADSTS501481: The Code_Verifier does not match the code_challenge supplied in the authorization request ...",
"error_codes": [
501481
],
...
}
If you wish to check token contents and verify the token, you may use an online tool to do so. Be careful! Disconnect from the internet after loading the page to make sure nothing gets sent to a server. Copy the id_token into the decoder. For instance, using https://jwt.io:
